Steps to Install Eclipse using install new Software:
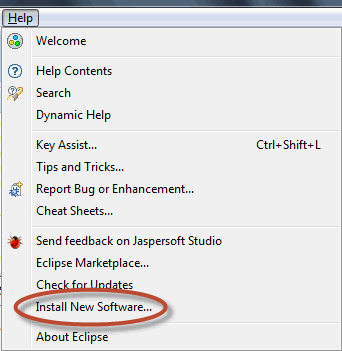
Step 1:
In Eclipse, on top menu bar, Under Help Menu, Click on “Install new Software” in help window.
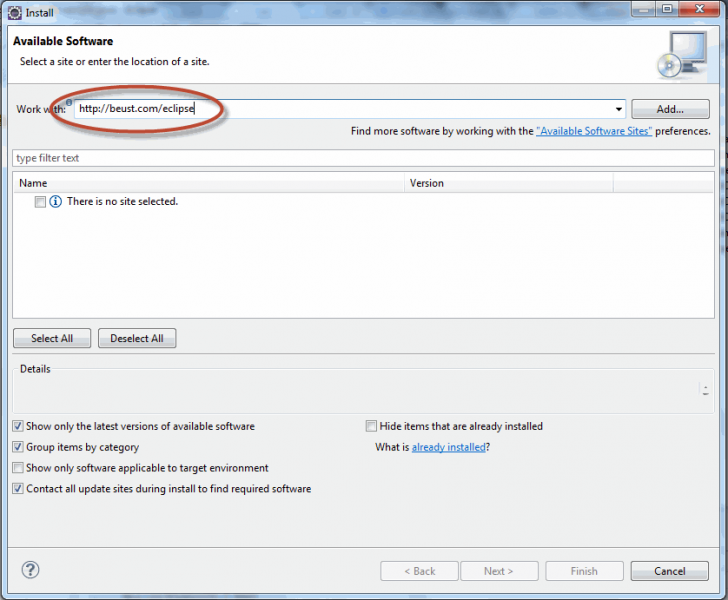
Step 2:
Enter the URL (http://beust.com/eclipse/) at Work with field and click on “Add” button.
Step 3:
Once you click on “Add”, it will display the screen, enter the Name as “TestNG”.

Step 4:
After clicking on “OK”, it will scan and display the software available with the URL which you have mentioned.
- Now select the checkbox at TestNG and Click on “Next” button.

Step 5:
It will check for the requirement and dependencies before starting the installation.
- If there is any problem with the requirements/dependencies, it will ask you to install them first before continuing with TestNG. Most of the cases it will successfully get installed nothing to worry about it.

Step 6:
Once the above step is done, it will ask you to review the installation details. If your are ready or Ok to install TestNG, click on “Next” to continue.
Step 7:
Accept the Terms of the license agreement and Click on “Finish” button.

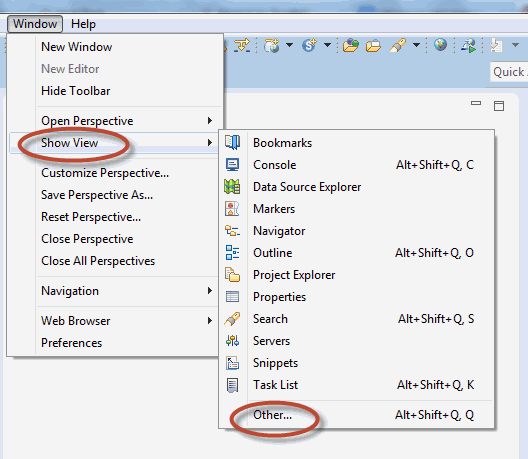
Finally once the installation is done, you can check the TestNG is installed properly or Not.
- Go to Windows Menu bar, and Mouse Over on “Show View” and Click on “Other” at the last as in the below screen shot.
Expand Java folder and see if the TestNg is available as in the below screen shot.

Download the Selenium Java Client Driver
You can download the Selenium Java Client Driver from this location: http://docs.seleniumhq.org/download
Configure Eclipse IDE with WebDriver
- Launch the “eclipse.exe” file inside the “eclipse” folder that we extracted, the executable should be located on C:eclipseeclipse.exe.
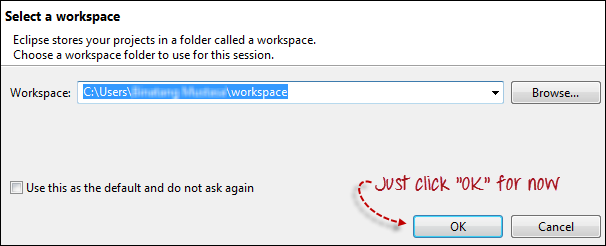
- When asked to select for a workspace, just accept the default location or choose the location by using browse option.
- Create a new project through File > New > Java Project. Name the project as “Seleniumtest”.
- Right-click on the newly created project and select New > Package, and name that package as “Newpack”.
- Create a new Java class under “Newpack” by right-clicking on it and then selecting New > Class, and then name it as “Example”. Your Eclipse IDE should look like the image below.

- Right-click on and select Properties.
- On the Properties dialog, click on “Java Build Path”.
- Click on the Libraries tab, and then click “Add External JARs”.
- Navigate to C:selenium-2.25.0 (or any other location where you saved the extracted contents of “selenium-2.25.0.zip”.
- Add all the JAR files inside and outside the “libs” folder. Your Properties dialog should now look similar to the image below.

- Finally, click OK and we are done importing Selenium libraries into our project.