This document explains step by step information on configuring Form Based Authentication (FBA) in SharePoint 2010. This document resolves authentication issues by configuring a SharePoint 2010 site with form based authentication.
There are two instances involved in Migration of AD Users to Database users.
1. Why we require Database users: Active Directory users are limited to only domain users (within the company) and not external users, if the external users are considerably more exceeding more than 500+ then we require the users to be database users.
2.Process of Migration from AD to FBA Users: Steps for Migration of AD Users to FBA Users.
Creating Form Based Authentication (Mixed mode) Site for EPM Live server
1.Take a Backup of existing Database of Live PWA site
- WSS_Content
- ProjectServer_Archive
- ProjectServer_Draft
- ProjectServer_Published
- ProjectServer_Reporting
2. Create New Web App with Claims Based Authentication
- Create New Web App with Claims Based Authentication
- Restore all 5 Backed up database with New Name
- Provision New Project Web Application with above Web App as host site and with new databases restored above
- Test Site for existing AD users
- Migrate and Test Custom User Groups and User Categories
- Test the existing Projects in new FBA PWA Application
3.Develop/ configure to Enable Forms Based Users for EPM
- Change Authentication Provider ( set to Domain MemebershipProvider)
- Update web.config file of the web application
- Update web.config file of the STS (Secure Token Service) Application
- Enable / Update site collection specifying Windows users as a primary admin and a user from SQL membership as the secondary admin
- Attach and test Custom Login Form required in PWA site -Use same form as in developed in local portal
4. Apply the Customizations on Web Application (PWA)
- Deploy Custom Web Parts on EPM
- Configure SSRS reports (SharePoint Integration mode) in PWA Claims based site
- Deploy all EPM BI Reports on PWA
5.Backup and Restore latest Project Server DB on the site
6.Map the original URL to epmas/pwa
Configuring EPM Live Site Form Based Authentication
There are two authentication types for SharePoint: Forms based and Windows based authentication. There are a lot of articles dedicated to configuring SharePoint to use either both of one of these authentication modes. For instance, But in we would like to point out the way how to use Forms-based authentication for Project Server 2010 to enable non-domain users to log in to PWA site.
Suppose you’ve already configured new web application to use Forms Based authentication. Let’s say the name of ASP.NET Membership provider used for it is My_FBA_Provider, and the name of ASP.NET Role manager name is My_FBA_Role. Also suppose you have already created test user (let its login/password pair be test_user1/p@ssw0rd) and verified it’s workability for some test site collection belonging to your web application. Now let’s go through the following list of steps to allow our user to login to PWA.
Following are the steps required to configure FBA in SharePoint 2010. We can use MS SQL Server 2012 database as the membership store for users.
1.Setting up ASP.NET Forms Authentication User and Role Data Source
- Create Database
- Configure Membership and Role Provider and Create User
2.Create Web Application and Site Collections
3.Configure Web.Config file
- Configuring FBA web application web.config file
- Configuring Central Administration web application web.config file
- Configuring Security Token Service web.config file
4.Adding User Policy to the FBA Web Application
5.Verification Steps
Form Based Authentication steps
Setting up ASP.NET Forms Authentication User and Role Data Source
This section explains creation of database which is used to store user’s information such as credentials and roles which is used for Form Authentication. This section also explains the configuration of Membership and Role providers in the web.config file and creation of users using ASP.NET configuration wizard. This article shows creating a user and which will be used for testing Form Authentication later.
Create Database
To create database, Microsoft has provided a tool/ utility called aspnet_regsql.exe that creates a db for us. This utility can be found in the windir%Microsoft.NetFramework64v2.0.50727 folder. Please see the image below:

Executing aspnet_regsql.exe file will open ASP.NET SQL Setup wizard that will walk through creating the ASP.NET database. I have added the database name as ClaimSecureStore and configured it for Windows authentication. Please see the image below:
Click on the Next button. Please see the image below:

Select Configure SQL Server for application services option. Here provide SQL Server name and new database name to create. I provided new database as ClainSecureStore. Please see the image below:

By clicking next it will ask for confirmation and then create database on given server. Then open SQL Management Studio and confirm about newly created database.

Configure Membership and Role Provider and Create User
Using ASP.NET Configuration Wizard, users can be added into the newly created database. This can be achieved by creating web site that will allow us to add the users and roles and also ensure the database connection strings, membership and role providers are correctly configured before we bring SharePoint in to equation.
Below steps explains creating web site and configuring membership and role providers and executing ASP.NET Configuration Wizard.
1. Open Visual Studio and select ASP.NET Web site.
2. Open web.config and add connection string. I added as shown in below image.

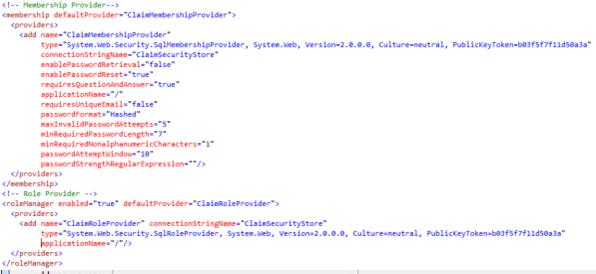
3. Now next is to add the membership provider and role provider within the tag. To avoid mistake you can take from machine.config file from system32 folder and do required changes. See the below image for more information.
4. Create Login Page by making use of Login control and Register page by making use of control to check these added Membership provider and Role provider works fine or not. For reference I am adding source code.

Create Web Application and Site Collection
To create web application and site collection follow below mentioned steps.
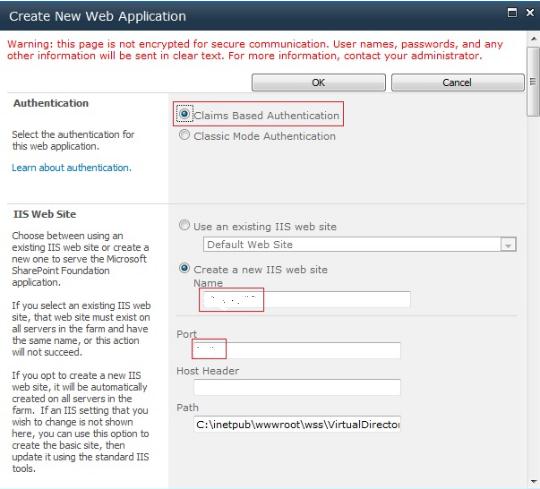
1. Go to Central Administration ==> Application Management ==> Select ‘Manage Web Application’ link present under ‘Web Applications’ section.
2. Click on ‘New’ option in the ribbon.
3. See the below image for ‘Authentication’ and ‘IIS Web Site’ section. I gave site name as SPClaim at port 7444.
4. Keep ‘Security Configuration’ as default and configure ‘Claims Authentication Type’ section as given below.

5. Initially we will keep default login page and that be change later on.
6. Then provide Content Database name and Application Pool name and create Web application and then create Site collection of your choice. I created Team Site.
Configure the Web.Config file
Configuring newly created SPClaim web application web.config file
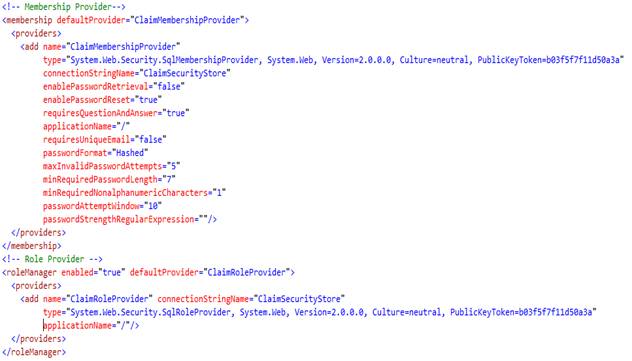
Open SPClaim web application web.config file and add the below entries.
1. Add Connection String. Connection String before the tag. See the below image for more information.

2. Add Membership Provider and Role Provider as shown below:

Configuring Central Administration web application web.config file
Follow the same steps as we did for SPClaim Web Application same for Central Admin Web application.
Configuring Security Token Service web.config file
Open Security Token Service web.config file from %Program Files%Common FilesMicrosoft Sharedweb server extensions14Web ServicesSecurityToken location and follow the same steps as we did for SPClaim Web Application same for Central Admin Web application.
Adding User Policy to the FBA Web Application
Follow the below steps to add user policy to the web application.
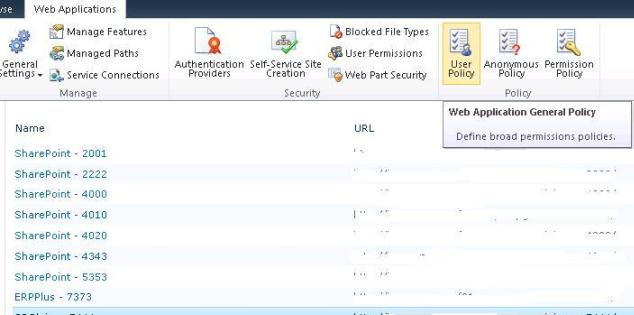
1. Go to Central Administration ==> Manage Web Applications ==> Select the FBA web application and click on ‘User Policy’ option in the ribbon.
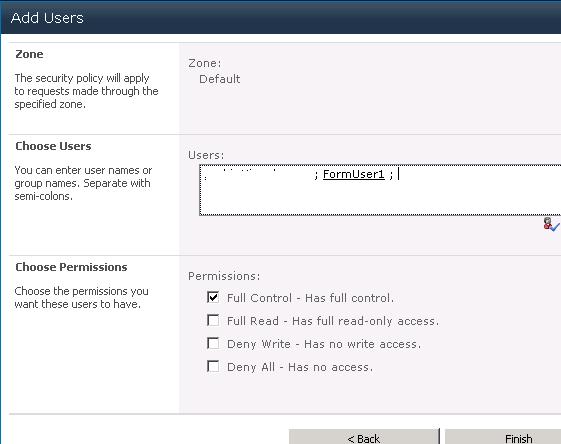
2. Click on ‘Add Users’ link and select ‘Default’ as the zone and click on ‘Next’ button.


3. Add Users from domain as well from SQL Server database.
Verification Steps
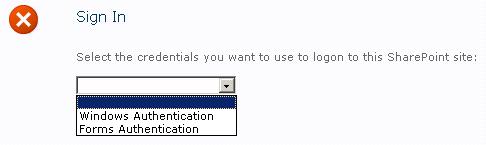
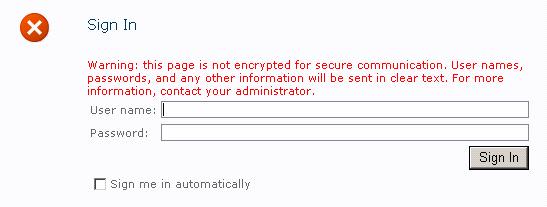
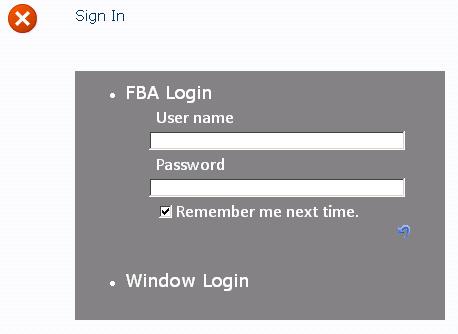
Go to the SPClaim application and select Form Based Authentication.
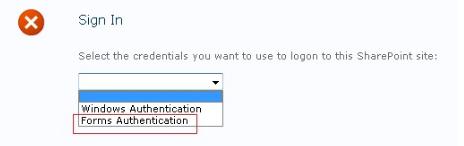
In the next page, provide UserName and Password from the database.

With the correct credentials, the user will login to the site:

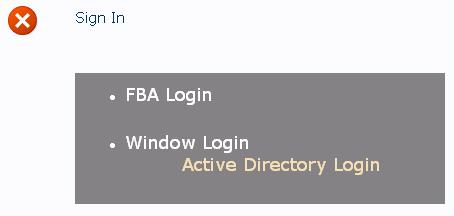
Custom Login Page for Application
When user creates a web app with Form Based application he will get following default screen.
And on selection of Forms Authentication will get another screen.
If user wants to replace this login screen with custom screen then it can be done as follows:
1. For creating custom Login create Application Page so that on deployment it will reside in Layout folder. Keep following point in mind while creating Custom Login page
- Copy the .dll file to the GAC (for example, using gacutil.exe)
- In Page directive replace Inherits property with FULL Assembly name
- .aspx, .js files to the LAYOUTS directory
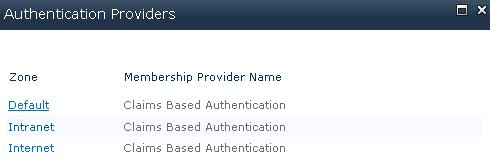
2. On performing the above steps, our custom page will be in the Layout folder. Now we have to apply this page to our Web application. For doing so:
- In Central Admin, select the FBA Web Application and click on the Authentication provider as shown below:

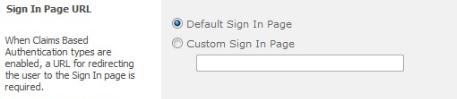
- It will open the window, select the default link.
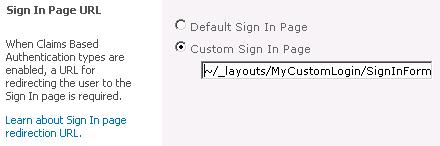
- Here it will open window. In this window, scroll and look in section Sign Page URL. Here select Custom Sign in page and provide path of newly created custom login page in Layout folder as shown below and then save it:
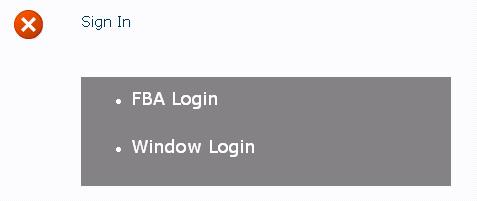
After saving, try to access the FBA application then it will display the custom login page as shown below.
END